

Red packets is basically a well decorated and designed envelope that used to hold monetary gifts. It can be easily made just with some simple paper, scissor, glue and coloring materials. It can be a fun project for young children and family.
Before starting out the project, do plan first on the design and material to be used. There is no objection to make red envelope from plain red paper (classical red packets before the printing press are mostly DIY), or using recycle material to make your red packet environmental friendly. However using recycle material for red packet may brings mix feelings depends on the receiver end, as being a new year gift, it is traditionally means the gift should be new.
Planning out in making your DIY red packet.
There is no standard sizing for the red packets, however a general rules applies. A full sized standard red packet is usually slightly larger than the largest paper bank notes available in the area. It facilitate the easy putting in and taking out of the bank note. Smaller sized standard red packet is also usually larger than the half folding of the largest paper bank notes available in that area.

The size of the red packet is depends on how you want to place your bank notes.
Choosing the right paper material can affects the quality and the appearance of the red packet. A thick card paper can make a premium feel red packet. Thin paper will makes the red packet feels light, fragile and cheap. Hence most of the collector editions red packet never skimmed on paper quality.
The list of items needed to make a red packet are as follows :
- Red color paper / card paper (other color such as gold or yellow can be used, as long as the color chosen will bring good meanings)
- Scissor / Blades
- Ruler
- Glue / Glue sticks
- Decorative elements such as glitters / color pens and pencils etc … depends on your designs.
First, measure the dimension of your local currency, ensure the packet can hold the bank notes nicely without been tight fit or folding. leave some small spaces along the edges. You can decide to have your red packet to load the bank notes from the top (portrait designs) or from the side (horizontal or wallet designs).
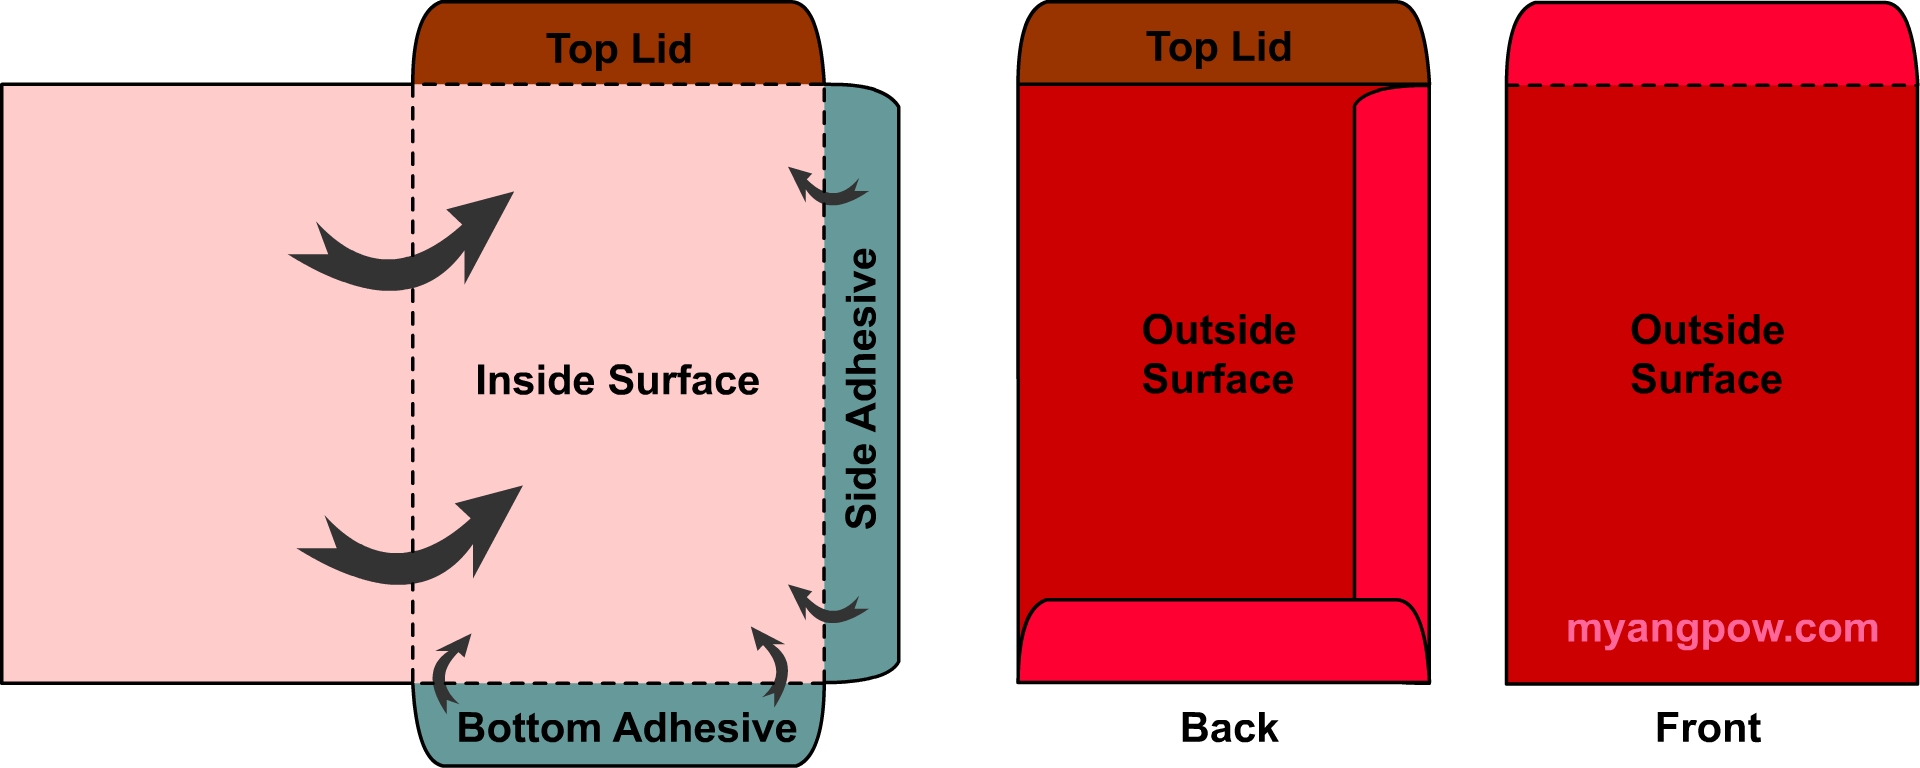
Draw and mark the outline of the fold and cuts on the paper. Make sure you consider which is the outside surface and inside surface. Some fancy card paper have smooth and rough surface. Ensure leave some extra space for adhesive of the edges later. Allow diagonal cuts on the corner to make a clean adhesive contact.
Cut out the designated outlines and fold the adhesive contact edges. A ruler can be used to facilitates straight folds.
Apply glue on the adhesive contact edges and fold it to shape. Wait for the glue to dry and check out any flaws need to be corrected.
You now can decorate the outside surface of your red packet to your desire taste. Preferably not too moist or wet contacts (like water color) as it may wrinkle and deform the red packet when drying up. Thicker card paper will withstand better moist tolerance and allow glitter glue to be used.
The is no limitation on how you would design and decorate your red packet, as long as it looks nice and good for giving to friends and relative during festive seasons.